What is SAP Fiori?
SAP Fiori is the go-to user interface on the S/4HANA system.¬Ý Fiori apps provide a role-based user experience to end users with all the functions they need for their daily work. This is opposed to the old SAP GUI transactions where one transaction catered for multiple roles, making them complicated and hard to use.
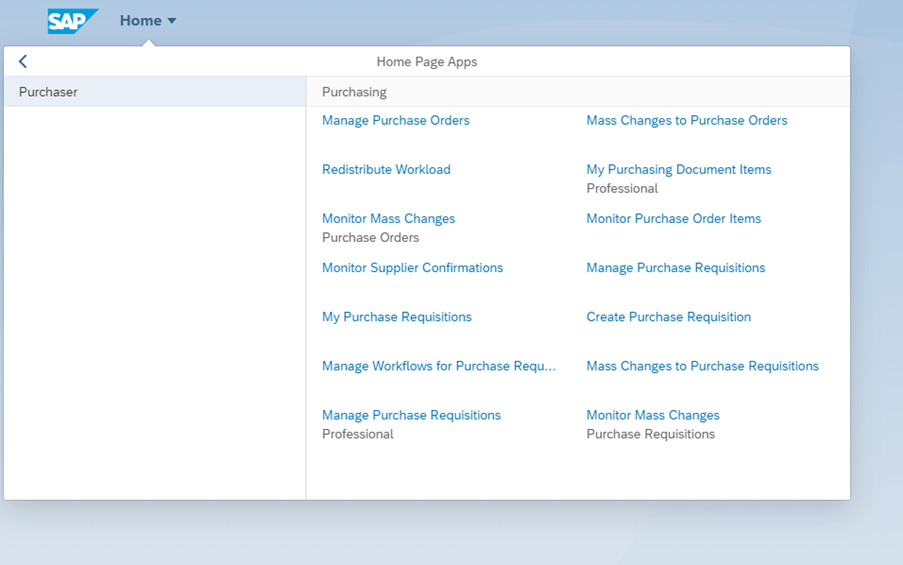
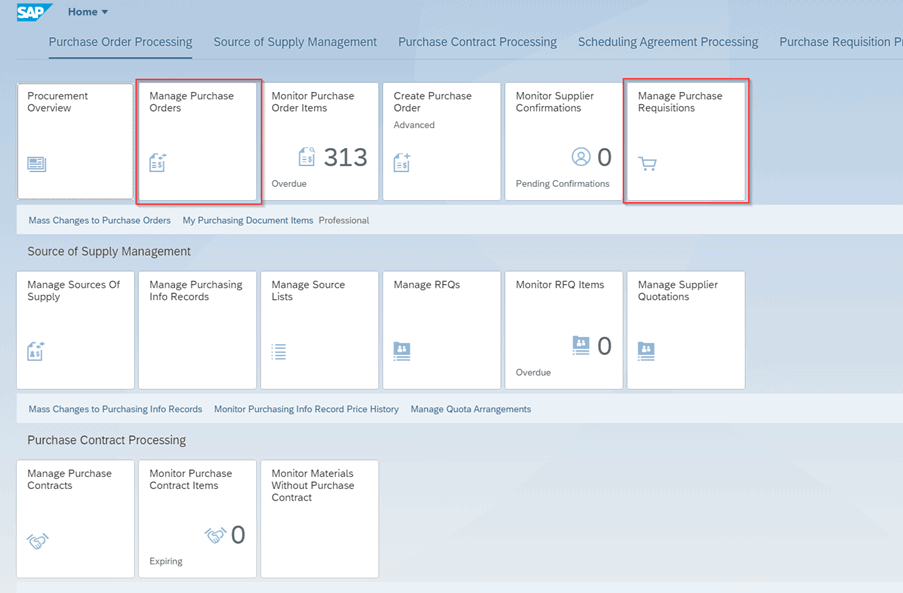
Fiori apps have been built using modern technology with SAPUI5 library. They run in a browser and are fully responsive. This means that they can be used on desktop, tablet or a mobile device and the screen adjusts accordingly. Here is an example of how ‘Manage Purchase Orders’ looks on Fiori apps:
How do I activate SAP Fiori apps?
This guide will describe the process that should be followed to activate relevant Fiori apps.

Firstly, initial identification of the required apps and their corresponding business roles is needed. The next step is to install these apps in a sandbox system using rapid activation and perform fit gap analysis through app testing and exploration. Finally, create a custom role with catalogues and groups and adjust Fiori Launchpad content to the specific needs of the business user.
¬Ý
1. Scoping
Before activating any Fiori apps,¬Ý planning and identifying which ones will be required. For this scenario let us assume you would like to find relevant apps for a ‚ÄúPurchaser‚Äù role. All standard apps are listed in Fiori Apps Library¬Ýand this will be the starting point. Once the necessary apps are identified,¬Ý their detailed information can be viewed as well as a list of relevant business roles for content activation.
¬Ý
1.1.¬Ý Choose your apps
You can search for ‘purchase’ related apps and identify ‘Manage Purchase Orders’ and ‘Manage Purchase Requisitions’ which should be activated and displayed to the user in the Fiori Launchpad. You can also inspect them individually to find out more details e.g., about implementation, whether they are suitable for your system version, what front end and back-end components are required and have a glimpse of a screenshot what the UI looks like:

Once the apps have been identified, create an aggregated view that will provide you with a list of relevant business roles for later content activation:
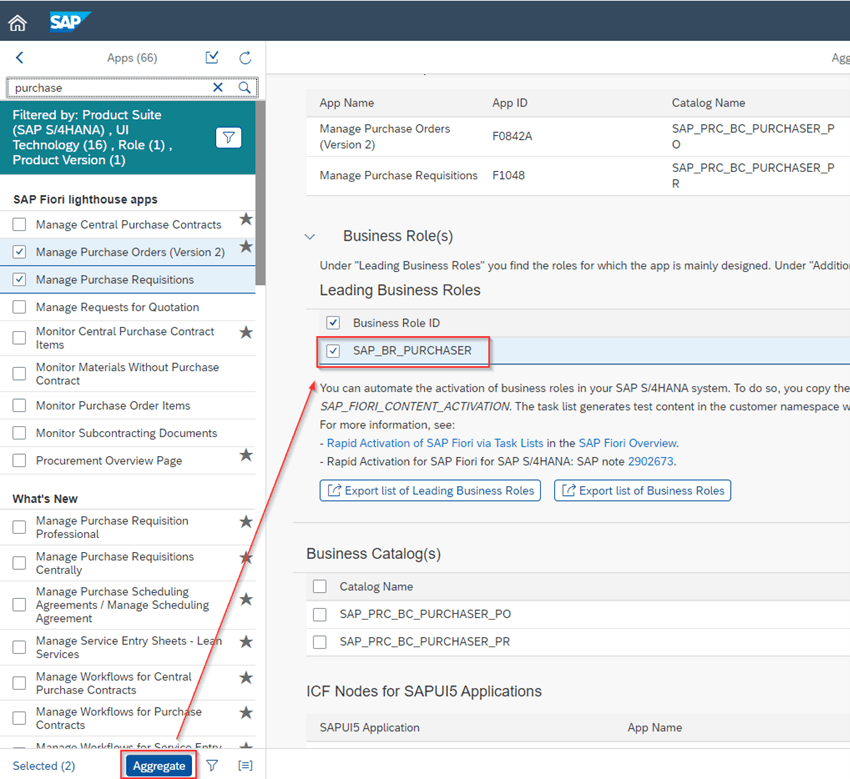
You can see that both apps share the same role SAP_BR_PURCHASER and you will use that role later on for our task list-based activation.
¬Ý
2. Activate SAP Fiori content
After identifying relevant apps and their business role they can be quickly activated in the SAP system and perform fit-gap-analysis based on the SAP standard content. It will also serve as a basis for the definition of customer-specific roles and catalogues. Ideally these steps should be performed in the Sandbox environment.
Use the Task Manager transaction for SAP Fiori content activation task list run to activate all required Fiori apps based on select SAP Fiori Business roles and their artifacts like OData services, SICF nodes, business roles and it will even create a test user for us.
¬Ý
2.1.¬Ý Configure SAP Fiori Rapid Activation task list
Log on to SAP GUI and launch transaction STC01. Enter task list SAP_FIORI_CONTENT_ACTIVATION and execute:

A configuration screen for an SAP Fiori content activation task list run can be seen where you will be able to scope task lists for selected business role and generate test users:
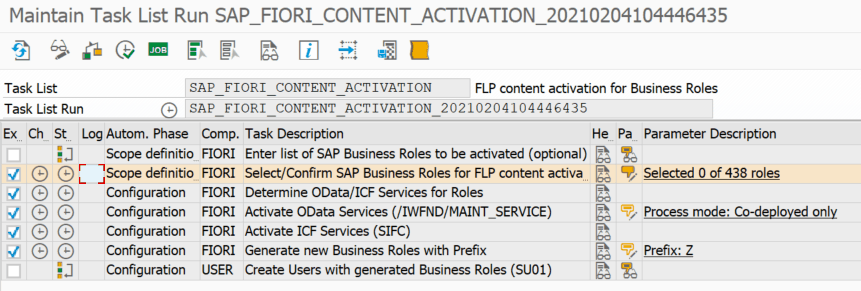
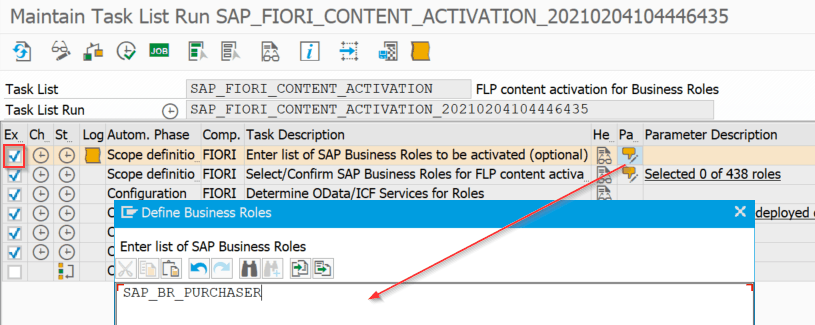
Select the first task and as a parameter enter the business role identified in the ‘Scoping’ section which is SAP_BR_PURCHASER:
As a result, we should be able to see that 1 role out of 438 has been selected in the second task list and verify which one by clicking on the parameter icon:
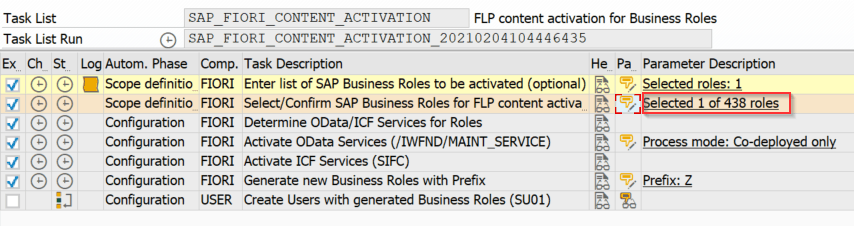
You can also specify a prefix for the business roles to be generated as well as whether a test user should be created:
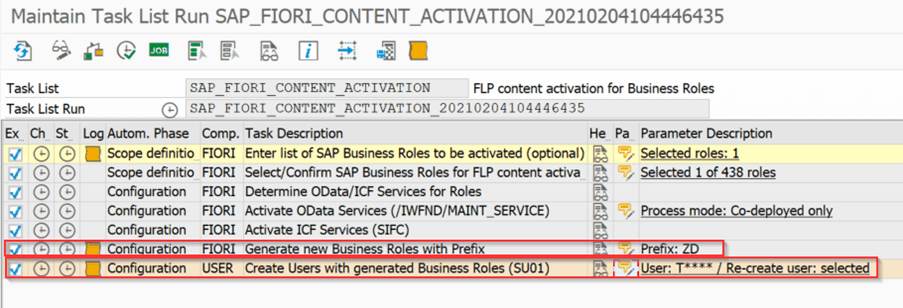
Inside of the test user details we need to specify an initial password and your foundation role for generic Fiori access.
¬Ý
2.2.¬Ý Execute activation task list
Once completing the necessary set up steps you are now in place to execute the task list run.
After the execution has completed, check in the status column if all tasks lists have been successfully completed:
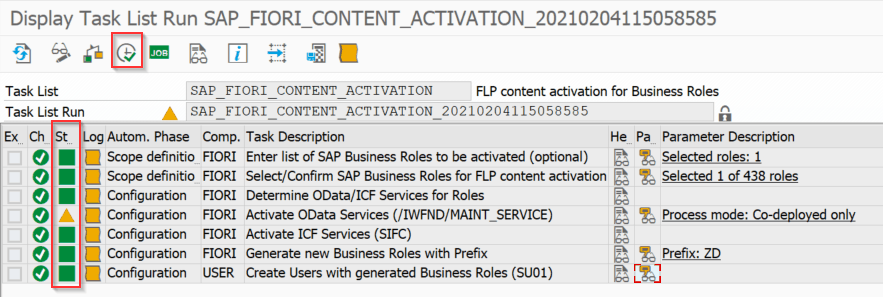
In the panel log underneath we can view the test user name created:
![]()
¬Ý
3. Test the activated content in SAP Fiori Launchpad
All required apps have now been activated and their artifacts based on the business role. It’s time to test the content in Fiori Launchpad, explore the apps and perform fit-gap analysis to find out if they are the right tools for the user.
Log on to the Fiori Launchpad with the test user id. You will be able to view all apps related to the test user role ZD_BR_PURCHASER. You can see the “Manage Purchase Order” and “Manage Purchase Requisition” below. Now it is time to test them paying particular attention to the in-app navigation.
¬Ý
4. Adapt and customise Fiori Launchpad Content
Up to this point we have identified activated and tested the purchaser apps. Now it is time to create a custom authorization role, catalogue, and business role to customize the Fiori Launchpad content.
¬Ý
4.1.¬ÝCreate a custom catalogue
Begin with creating a custom catalogue based on an existing SAP catalogue.
Launch transaction /UI2/FLPCM_CUST (Launchpad Content Manger) and search for ‚ÄúPURCHASER‚Äù. Select catalogue SAP_PRC_BC_PURCHASE_PO which is the one that contains tiles and target mappings of¬Ý ‚ÄòManage Purchase Order‚Äô app. Click the ‚ÄòCopy‚Äô button and save under a new name:
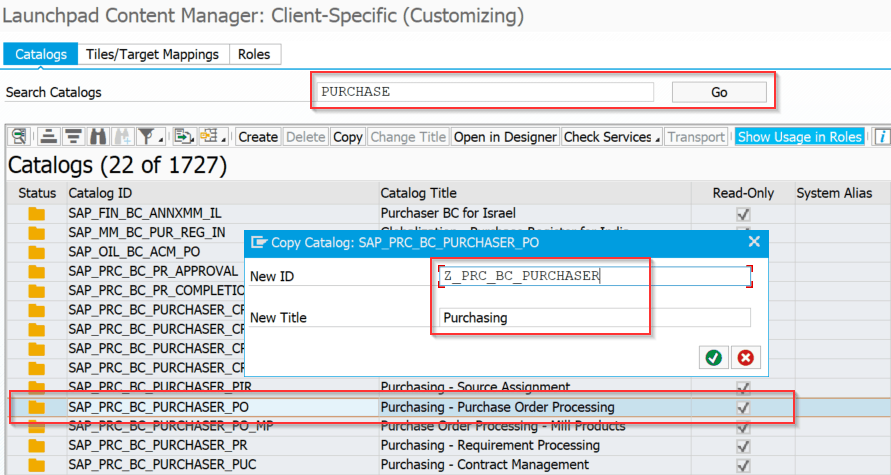
What you have achieved so far is a custom catalogue which is a copy of standard SAP one. It consists of tiles and apps that you may not necessarily need so you can remove the unwanted ones and you can adjust it based on your requirement.
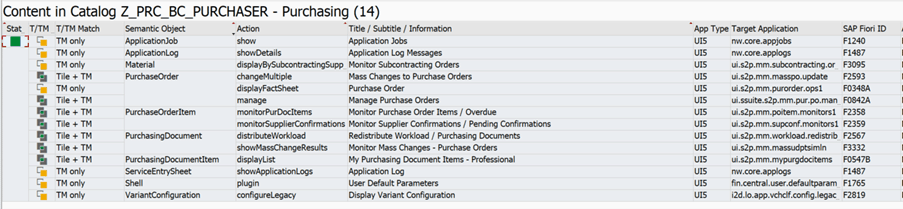
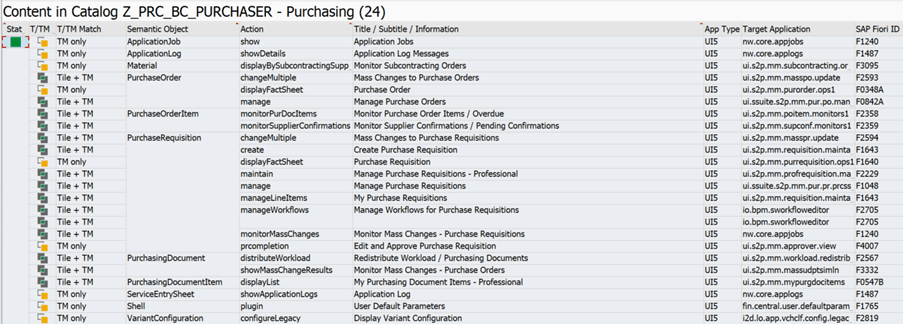
In the below example, all items with column Application Type <> UI5 have been removed. It is important to not to remove target mappings used for app-to-app navigation as this will break it.
My catalogue content looks as follows:
The next step is to add the Purchase Requisition apps to the catalogue
Click on ‘Add Tiles/Target Mapping’ button:

And search for Purchase Requisition filtering by UI5 application type, select the Purchase Requisition semantic object items and click on “Add Tile/TM Reference” button:
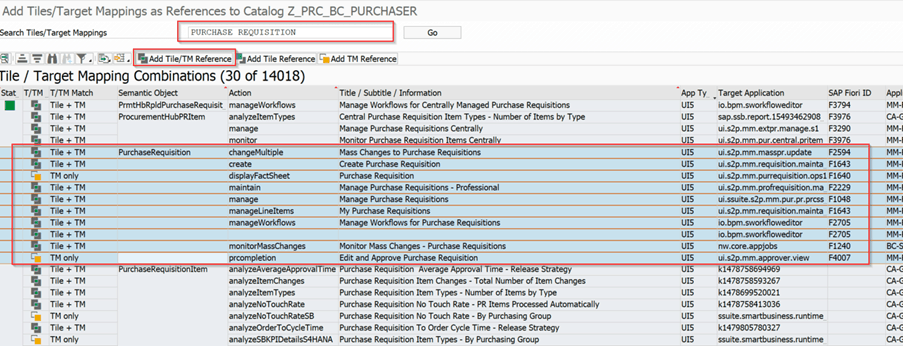
The content gets added to the catalogue Z_PRC_BC_PRUCHASER and it looks as follows:
¬Ý
4.2. Check Services
To be able to use apps which are included in the business catalogue the related OData and ICF services need to be activated. You can validate right in this transaction:
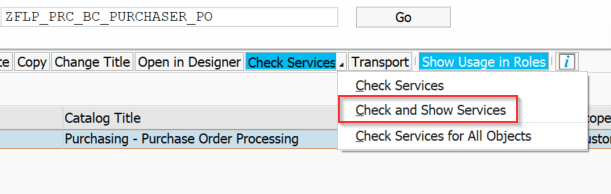
If all services show green status light it is good to go. If they do not, then you need to activate them manually either using transaction /IWFND/MAINT_SERVICE or by using task list SAP_FIORI_FCM_CONTENT_ACTIVATION to activate content included in your newly created business role (not part of this blog).
¬Ý
5. Create SAP Fiori launchpad Business group
So far, you have created the catalogue. If you assign it to a role the user will be able to use the apps but the tiles won’t appear on the home page by default. The next will be to create a Fiori launchpad group with the tiles from our custom catalogue.
Launch SAP Fiori designer and create a new group:
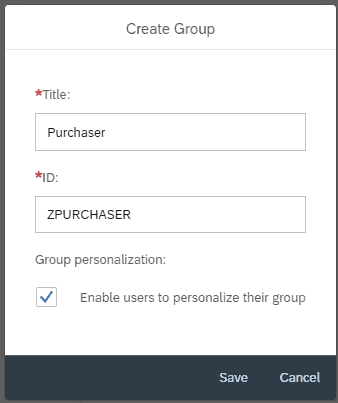
Add tiles from our Catalogue Z_PRC_BC_PRUCHASER. You are interested in ‘Manage Purchase Orders’ and ‘Manage Purchase Requisitions’ only:
¬Ý
6. Add the catalogue and group to authorisation role
This is the last step where you will create a custom authorization role, assign newly ¬Ýcreated catalogue and group and assign the role to a user.
¬Ý
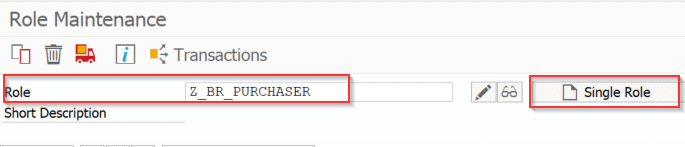
6.1. Create a new role
Launch transaction PFCG, enter the role name and ‘Create Single Role’:
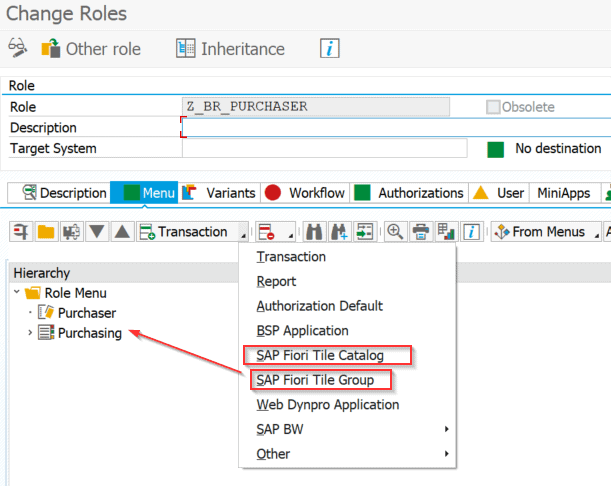
Assign the custom catalogue ID: Z_PRC_BC_PRUCHASER and Group ID: ZPURCHASER:
Save the role and generate profile.
Now we can remove the demo role from the user and assign this one instead (transaction SU01).
¬Ý
6.2. Test user access
You are almost finished! It is time to test the user access with our newly created user role.
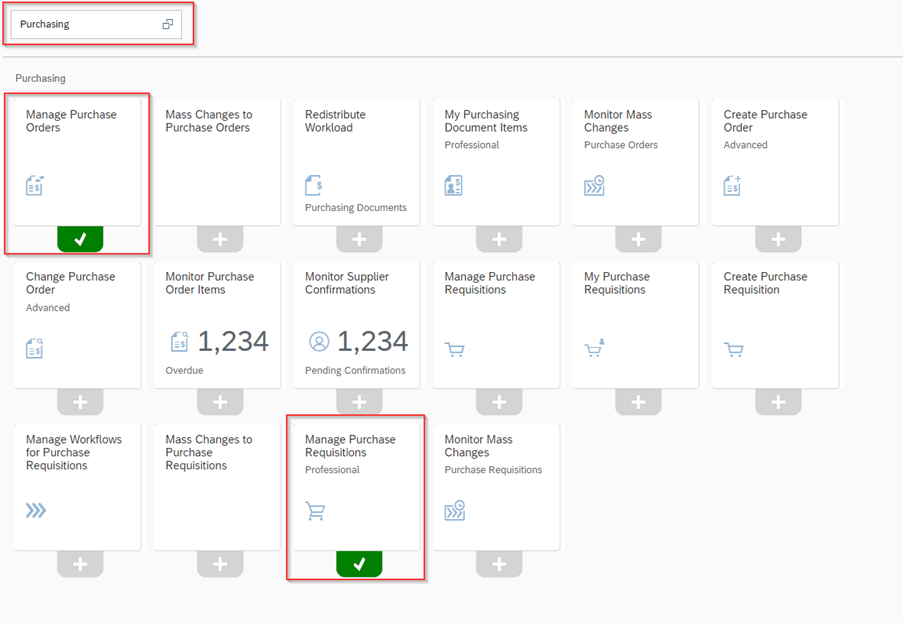
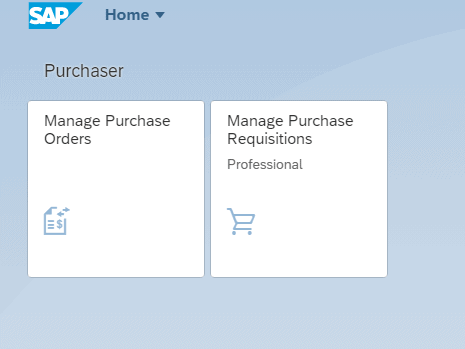
Log in to the Fiori launchpad with the test user. You should be able to view the “Purchaser” group by default with two tiles:
Users can also search and use other apps that are added in the catalogue but not in the group hence not visible by default: